win32 · Шаг 2. Пути и property sheets
На этом шаге вы подготовите общие настройки путей (property sheets) и папки, в которые будут складываться результаты сборки. Делается один раз.
Везде ниже считается, что корень проекта — папка, в которой лежат
src\,build\,dist\,samples\. В примерах он обозначен как<КОРЕНЬ>. На машине разработки это былоI:\Python Project\TMC_Suite.
2.1 Создайте папки результатов (если их ещё нет)
В корне проекта должны существовать четыре папки. Для win32 обязательны две из них:
<КОРЕНЬ>\dist\win32\lib    ← сюда лягут 6 файлов .lib
<КОРЕНЬ>\dist\win32\bin    ← сюда лягут 6 файлов .exe
(Папки dist\win64\lib и dist\win64\bin нужны только для 64‑битной сборки —
для win32 их можно не трогать.)
Если папок нет — создайте их вручную в проводнике или командой PowerShell:
New-Item -ItemType Directory -Force -Path "<КОРЕНЬ>\dist\win32\lib", "<КОРЕНЬ>\dist\win32\bin"
2.2 Зачем нужны property sheets
Property sheet (лист свойств, файл .props) — это файл общих настроек, который
подключается к проектам Visual Studio. Настроили один раз — применилось ко всем
проектам. Благодаря им не нужно в каждом проекте вручную прописывать пути к заголовкам,
библиотекам и папкам вывода.
В проекте уже подготовлены три листа свойств в папке <КОРЕНЬ>\build\:
| Файл | Назначение |
|---|---|
Common.props |
общие пути: заголовки src\Include, библиотеки dist\<платформа>\lib |
LibOutput.props |
куда класть готовый .lib (для библиотек) |
ExeOutput.props |
куда класть готовый .exe (для программ) |
Ключевой момент: внутри Common.props папка платформы выбирается автоматически по
текущей платформе сборки:
- платформа
Win32→ папкаwin32; - платформа
x64→ папкаwin64.
Поэтому один и тот же .props корректно работает и для 32‑, и для 64‑битной сборки —
ничего переключать вручную не нужно.
В проектах TMC Suite эти property sheets уже подключены (это часть выполненной настройки сборки). Раздел 2.3 нужен только если вы открываете «голый» проект, где листа свойств нет.
2.3 Как подключить property sheet к проекту (если не подключён)
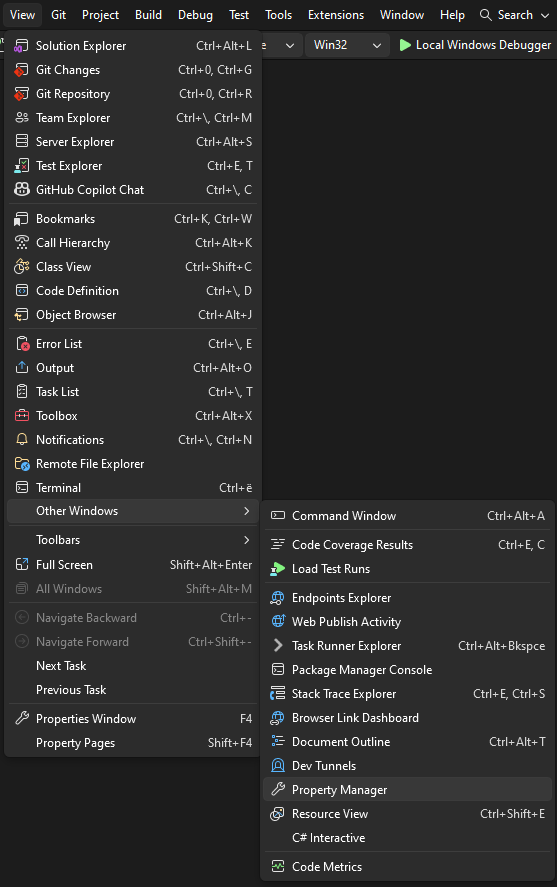
- В Visual Studio откройте меню View → Property Manager (Вид → Диспетчер свойств).
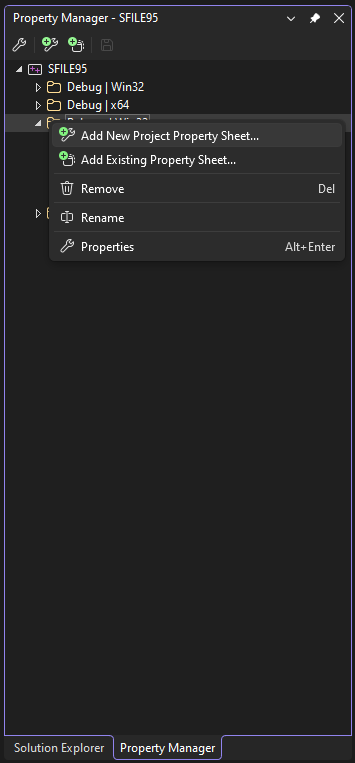
- В окне Property Manager раскройте проект, затем конфигурацию Release | Win32.
- Щёлкните правой кнопкой по конфигурации → Add Existing Property Sheet… (Добавить существующий лист свойств).
- Выберите нужный файл из
<КОРЕНЬ>\build\: - для библиотеки —LibOutput.props; - для программы (вьювер, ядро, FieldView) —ExeOutput.props.
(Оба этих файла внутри сами подключают Common.props, поэтому отдельно его
добавлять не нужно.)
После подключения пути к заголовкам (src\Include), к библиотекам
(dist\win32\lib) и папка вывода подставятся автоматически.
2.3.1 Проверьте, что проект не перебивает пути вывода (ВАЖНО)
Подключить property sheet недостаточно, если в самом проекте остались жёстко
прописанные пути вывода — они перебивают property sheet (явное значение в проекте
сильнее унаследованного). Признак проблемы: после сборки .lib попадает не в
dist\win32\lib, а, например, в d:\work\lib, и в окне Output появляется предупреждение
MSB8012:
warning MSB8012: TargetPath(...\SFILE95\Release\SFILE95.lib) does not match the Library's
OutputFile property value (d:\work\lib\sfile95.lib).
Чтобы вывод шёл в dist\win32\lib, верните «наследование» из property sheet:
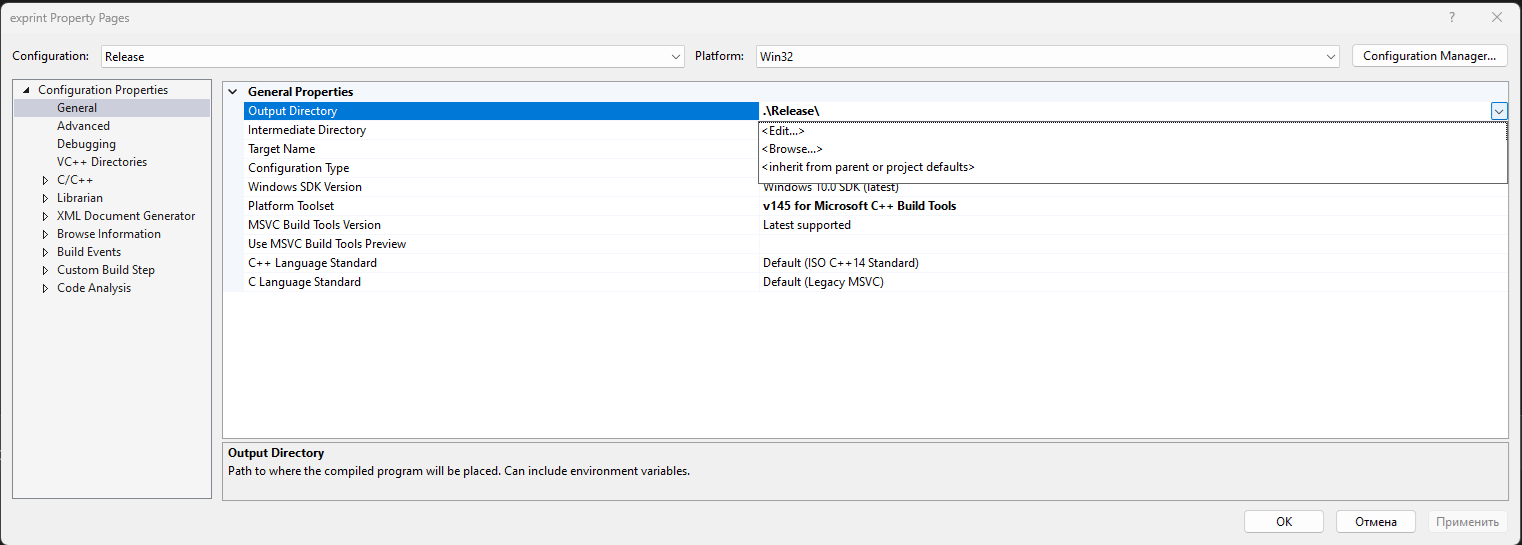
- ПКМ по проекту → Properties, вверху конфигурация Release | Win32.
- Configuration Properties → General → Output Directory — если стоит жёсткий путь
(
.\Release\и т. п.), раскройте стрелку справа →<inherit from parent or project defaults>(вернётся$(OutDir)из property sheet →dist\win32\lib). - Configuration Properties → Librarian → General → Output File — если стоит жёсткий путь
(
d:\work\lib\sfile95.libи т. п.), раскройте стрелку справа →<inherit from parent or project defaults>(станет$(OutDir)$(TargetName)$(TargetExt)). - OK. После пересборки
.libляжет вdist\win32\lib, предупреждение MSB8012 исчезнет.
Проверяйте это для каждого проекта (все 6 библиотек, программы): жёсткие пути
d:\work,e:\work,.\Release\могли остаться в любом из них и в любой конфигурации.
2.4 Выбор платформы и конфигурации (важно на каждой сборке)
В верхней панели Visual Studio, рядом с кнопкой запуска, есть два выпадающих списка:
- Конфигурация — выберите Release.
- Платформа — выберите Win32.

На протяжении ВСЕЙ 32‑битной сборки конфигурация должна быть Release, а платформа — Win32. Перед каждой сборкой проверяйте эти два списка.
2.5 Проверка, что проект отмечен на сборку (Configuration Manager)
Даже когда вверху выбраны Release и Win32, проект может быть не отмечен на
сборку для этой конфигурации. Тогда Build → Build Solution молча его пропустит,
и .lib не появится. В окне Output это выглядит так:
1>------ Skipped Build: Project: SFILE95, Configuration: Release Win32 ------
1>Project not selected to build for this solution configuration
========== Build: 0 succeeded or up-to-date, 0 failed, 1 skipped ==========
Причина: в файле решения .sln для конфигурации Release|Win32 есть привязка
проекта (ActiveCfg), но снят флаг сборки (Build.0) — то есть галочка Build в
Configuration Manager пустая. В исходных .sln библиотек этот флаг был выставлен
только для Release|x64.
Проверьте и при необходимости включите галочку:
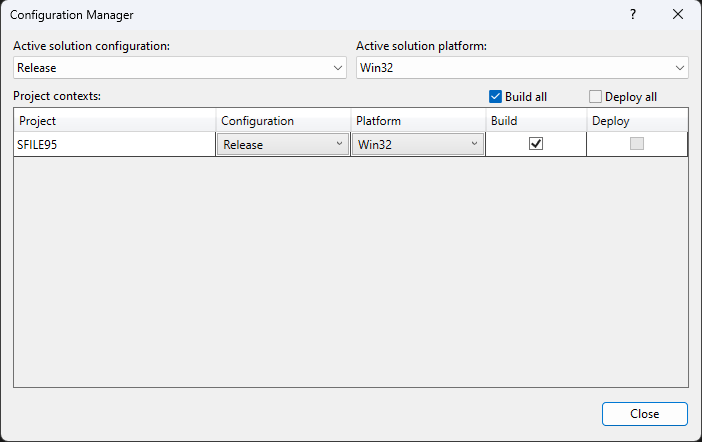
- Меню Build → Configuration Manager… (Сборка → Диспетчер конфигураций).
- Вверху: Active solution configuration = Release, Active solution platform = Win32.
- В строке проекта (например, SFILE95) проверьте колонку Build — галочка должна стоять. Если пустая — поставьте её.
- Нажмите Close (Закрыть).
Тот же изъян встречается в
.slnвсех 6 библиотек (и может быть в проектах программ). Если на сборке вы получили «Project not selected to build» — первым делом проверяйте эту галочку для конкретного проекта.
2.6 Проверка набора инструментов (toolset v145)
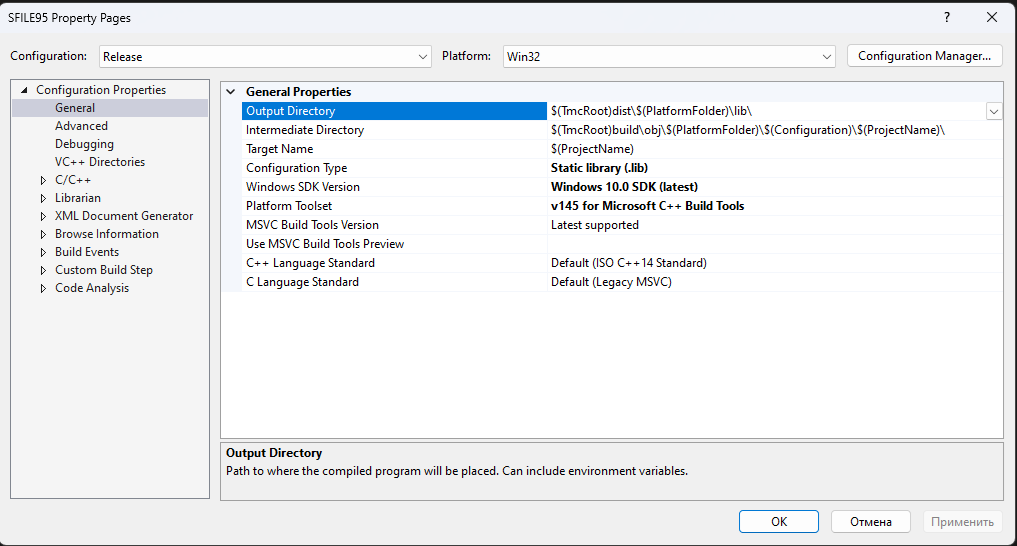
Если проект создавался под старую версию Visual Studio, набор инструментов мог остаться неправильным. В проектах TMC Suite он уже переключён на v145. Проверить можно так:
- Правой кнопкой по проекту → Properties (Свойства).
- Раздел Configuration Properties → General (Общие).
- Параметр Platform Toolset должен быть v145 (или «Visual Studio 2026 (v145)»).
Готово. Переходите к 03-build-libs.md (Фаза 1 — библиотеки).
win32 · Step 2. Paths and property sheets
In this step you will prepare the shared path settings (property sheets) and the folders that the build outputs will go into. This is done once.
Everywhere below it is assumed that the project root is the folder containing
src\,build\,dist\,samples\. In the examples it is denoted<ROOT>. On the development machine it wasI:\Python Project\TMC_Suite.
2.1 Create the output folders (if they do not exist yet)
Four folders must exist in the project root. For win32, two of them are required:
<ROOT>\dist\win32\lib    <- the 6 .lib files go here
<ROOT>\dist\win32\bin    <- the 6 .exe files go here
(The dist\win64\lib and dist\win64\bin folders are only needed for the 64-bit
build — for win32 you can leave them alone.)
If the folders do not exist, create them manually in Explorer or with a PowerShell command:
New-Item -ItemType Directory -Force -Path "<ROOT>\dist\win32\lib", "<ROOT>\dist\win32\bin"
2.2 Why property sheets are needed
A property sheet (a .props file) is a file of shared settings that is attached to
Visual Studio projects. Configure it once — it applies to all projects. Thanks to them
you do not have to specify paths to headers, libraries and output folders manually in
every project.
The project already contains three property sheets in the <ROOT>\build\ folder:
| File | Purpose |
|---|---|
Common.props |
shared paths: headers src\Include, libraries dist\<platform>\lib |
LibOutput.props |
where to put the finished .lib (for libraries) |
ExeOutput.props |
where to put the finished .exe (for programs) |
The key point: inside Common.props the platform folder is chosen automatically
based on the current build platform:
- platform
Win32-> folderwin32; - platform
x64-> folderwin64.
So the same .props works correctly for both the 32- and 64-bit builds — nothing needs
to be switched manually.
In the TMC Suite projects these property sheets are already attached (this is part of the completed build setup). Section 2.3 is only needed if you open a "bare" project that has no property sheet.
2.3 How to attach a property sheet to a project (if it is not attached)
- In Visual Studio open the menu View -> Property Manager.
- In the Property Manager window, expand the project, then the configuration Release | Win32.
- Right-click the configuration -> Add Existing Property Sheet….
- Select the appropriate file from
<ROOT>\build\: - for a library —LibOutput.props; - for a program (viewer, kernel, FieldView) —ExeOutput.props.
(Both of these files internally attach Common.props, so you do not need to add it
separately.)
After attaching, the paths to headers (src\Include), to libraries (dist\win32\lib)
and the output folder are substituted automatically.
2.3.1 Check that the project does not override the output paths (IMPORTANT)
Attaching a property sheet is not enough if the project itself still has hard-coded
output paths — they override the property sheet (an explicit value in the project
wins over an inherited one). A sign of the problem: after the build the .lib ends up not
in dist\win32\lib but, for example, in d:\work\lib, and the Output window shows the
warning MSB8012:
warning MSB8012: TargetPath(...\SFILE95\Release\SFILE95.lib) does not match the Library's
OutputFile property value (d:\work\lib\sfile95.lib).
To make the output go to dist\win32\lib, restore "inheritance" from the property sheet:
- Right-click the project -> Properties, at the top set the configuration Release | Win32.
- Configuration Properties -> General -> Output Directory — if it holds a hard path
(
.\Release\etc.), open the arrow on the right -><inherit from parent or project defaults>(it returns to$(OutDir)from the property sheet ->dist\win32\lib). - Configuration Properties -> Librarian -> General -> Output File — if it holds a
hard path (
d:\work\lib\sfile95.libetc.), open the arrow on the right -><inherit from parent or project defaults>(it becomes$(OutDir)$(TargetName)$(TargetExt)). - OK. After a rebuild the
.liblands indist\win32\liband the MSB8012 warning disappears.
Check this for every project (all 6 libraries, the programs): hard paths
d:\work,e:\work,.\Release\may remain in any of them and in any configuration.
2.4 Selecting the platform and configuration (important on every build)
In the top toolbar of Visual Studio, next to the Start button, there are two drop-down lists:
- Configuration — select Release.
- Platform — select Win32.
Throughout the ENTIRE 32-bit build the configuration must be Release and the platform Win32. Check these two lists before every build.
2.5 Checking that the project is marked to build (Configuration Manager)
Even when Release and Win32 are selected at the top, a project may be not marked
to build for this configuration. Then Build -> Build Solution silently skips it and no
.lib appears. In the Output window it looks like this:
1>------ Skipped Build: Project: SFILE95, Configuration: Release Win32 ------
1>Project not selected to build for this solution configuration
========== Build: 0 succeeded or up-to-date, 0 failed, 1 skipped ==========
Cause: in the solution file .sln, for the Release|Win32 configuration there is a
project mapping (ActiveCfg), but the build flag (Build.0) is cleared — that is, the
Build checkbox in Configuration Manager is empty. In the original library .sln
files this flag was set only for Release|x64.
Check and, if necessary, enable the checkbox:
- Menu Build -> Configuration Manager….
- At the top: Active solution configuration = Release, Active solution platform = Win32.
- In the project row (for example SFILE95), check the Build column — the checkbox must be set. If it is empty — set it.
- Click Close.
The same flaw occurs in the
.slnfiles of all 6 libraries (and may be in the program projects). If you get "Project not selected to build" on a build — first check this checkbox for that specific project.
2.6 Checking the toolset (toolset v145)
If the project was created for an old version of Visual Studio, the toolset could have remained wrong. In the TMC Suite projects it is already switched to v145. You can check it like this:
- Right-click the project -> Properties.
- Section Configuration Properties -> General.
- The Platform Toolset parameter must be v145 (or "Visual Studio 2026 (v145)").
Done. Proceed to 03-build-libs.md (Phase 1 — libraries).