win64 · Шаг 2. Пути, property sheets и добавление платформы x64
На этом шаге вы подготовите общие настройки путей (property sheets), папки результатов и убедитесь, что в проектах есть платформа x64. Делается один раз.
<КОРЕНЬ>— папка проекта, в которой лежатsrc\,build\,dist\,samples\. На машине разработки это былоI:\Python Project\TMC_Suite.
2.1 Создайте папки результатов (если их ещё нет)
Для win64 обязательны две папки:
<КОРЕНЬ>\dist\win64\lib    ← сюда лягут 6 файлов .lib
<КОРЕНЬ>\dist\win64\bin    ← сюда лягут 6 файлов .exe
Если их нет — создайте:
New-Item -ItemType Directory -Force -Path "<КОРЕНЬ>\dist\win64\lib", "<КОРЕНЬ>\dist\win64\bin"
2.2 Property sheets (общие настройки путей)
Property sheet (.props) — файл общих настроек, подключаемый к проектам. В папке
<КОРЕНЬ>\build\ уже готовы три:
| Файл | Назначение |
|---|---|
Common.props |
пути: заголовки src\Include, библиотеки dist\<платформа>\lib |
LibOutput.props |
вывод .lib (для библиотек) |
ExeOutput.props |
вывод .exe (для программ) |
Внутри Common.props папка платформы выбирается автоматически:
- платформа
Win32→win32; - платформа
x64→win64.
Поэтому для 64‑битной сборки (платформа x64) результаты сами попадают в
dist\win64\…. Ничего вручную переключать не нужно.
В проектах TMC Suite листы свойств уже подключены. Если открываете «голый» проект —
подключите их: View → Property Manager → раскрыть проект → конфигурация
Release | x64 → правой кнопкой → Add Existing Property Sheet… → выбрать
LibOutput.props (для библиотеки) или ExeOutput.props (для программы).
2.3 Добавление платформы x64 (если её нет в проекте)
В большинстве проектов TMC Suite конфигурации x64 уже добавлены (Win32/x64 ×
Debug/Release). Этот раздел нужен, если вы открыли проект, где есть только Win32.
Чтобы добавить платформу x64 один раз:
- Меню Build → Configuration Manager… (Сборка → Диспетчер конфигураций).
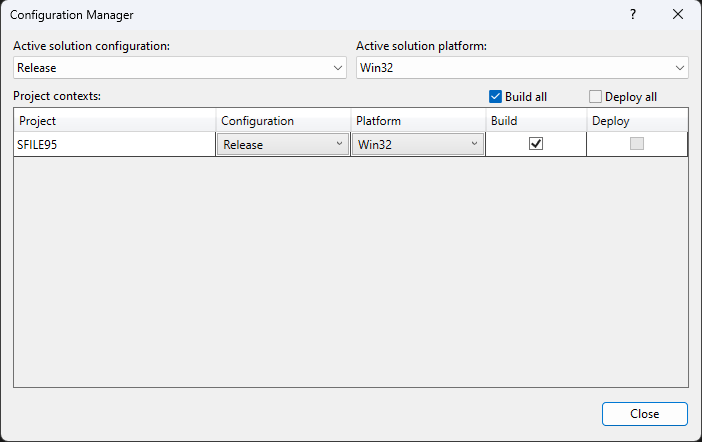
Отдельного скриншота для x64 нет — показано то же окно Configuration Manager, что и в инструкции win32. Здесь работайте со списком Active solution platform (шаги 2–3 ниже).
-
В столбце Active solution platform (Активная платформа решения) откройте выпадающий список и выберите
-
В окне New Solution Platform: - New platform: выберите x64. - Copy settings from: выберите Win32 (чтобы скопировать рабочие настройки 32‑битной конфигурации как основу). - Галочка Create new project platforms — оставьте включённой. - Нажмите OK.
-
Закройте Configuration Manager.
После этого у проекта появится платформа x64.
Примечание: при реальной сборке для 5 библиотек (complex, exprint, TMCLibError, Prepr, TMCIndan) x64‑конфигурации добавлялись именно так — зеркально win32, toolset v145. У SFILE95 они уже были. Правок кода ради этого не потребовалось (см.
08-porting-changes.md, раздел про Фазу 1).
2.4 Выбор платформы и конфигурации (на каждой сборке)
В верхней панели Visual Studio:
- Конфигурация → Release.
- Платформа → x64.

Скриншот общий с инструкцией win32 — окно то же. На снимке показана платформа
Win32; для 64‑битной сборки в этом же списке выберитеx64(конфигурация —Release).На протяжении ВСЕЙ 64‑битной сборки: конфигурация Release, платформа x64.
2.5 Проверка toolset (v145)
Правой кнопкой по проекту → Properties → Configuration Properties → General → Platform Toolset должен быть v145.
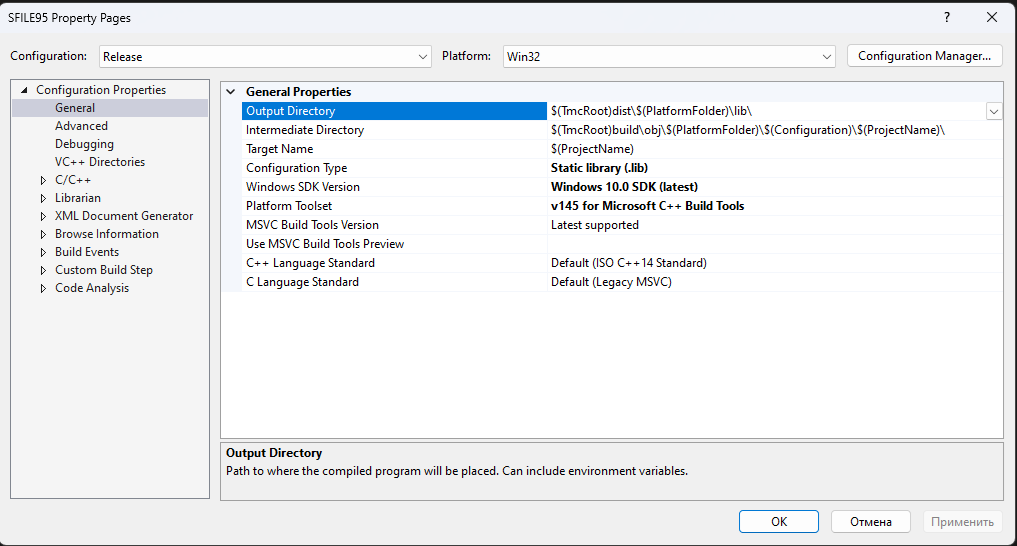
Скриншот общий с инструкцией win32 — окно свойств то же, toolset тот же v145. Открывайте свойства при выбранной платформе
x64(списки конфигурации/платформы вверху).
Готово. Переходите к 03-build-libs.md.
win64 · Step 2. Paths, property sheets and adding the x64 platform
In this step you will prepare the shared path settings (property sheets), the output folders, and make sure the projects have the x64 platform. This is done once.
<ROOT>is the project folder containingsrc\,build\,dist\,samples\. On the development machine it wasI:\Python Project\TMC_Suite.
2.1 Create the output folders (if they do not exist yet)
For win64, two folders are required:
<ROOT>\dist\win64\lib    <- the 6 .lib files go here
<ROOT>\dist\win64\bin    <- the 6 .exe files go here
If they do not exist, create them:
New-Item -ItemType Directory -Force -Path "<ROOT>\dist\win64\lib", "<ROOT>\dist\win64\bin"
2.2 Property sheets (shared path settings)
A property sheet (.props) is a file of shared settings attached to projects. The
folder <ROOT>\build\ already contains three:
| File | Purpose |
|---|---|
Common.props |
paths: headers src\Include, libraries dist\<platform>\lib |
LibOutput.props |
.lib output (for libraries) |
ExeOutput.props |
.exe output (for programs) |
Inside Common.props the platform folder is chosen automatically:
- platform
Win32->win32; - platform
x64->win64.
So for the 64-bit build (platform x64) the outputs land in dist\win64\… by themselves.
Nothing needs to be switched manually.
In the TMC Suite projects the property sheets are already attached. If you open a
"bare" project — attach them: View -> Property Manager -> expand the project ->
configuration Release | x64 -> right-click -> Add Existing Property Sheet… ->
select LibOutput.props (for a library) or ExeOutput.props (for a program).
2.3 Adding the x64 platform (if it is not in the project)
In most TMC Suite projects the x64 configurations are already added (Win32/x64 ×
Debug/Release). This section is needed if you open a project that only has Win32.
To add the x64 platform once:
- Menu Build -> Configuration Manager….
There is no separate screenshot for x64 — the same Configuration Manager window is shown as in the win32 guide. Here you work with the Active solution platform list (steps 2–3 below).
-
In the Active solution platform column, open the drop-down list and select
-
In the New Solution Platform window: - New platform: select x64. - Copy settings from: select Win32 (to copy the working 32-bit configuration settings as a base). - The Create new project platforms checkbox — leave it enabled. - Click OK.
-
Close Configuration Manager.
After this the project will have the x64 platform.
Note: in the real build, for 5 libraries (complex, exprint, TMCLibError, Prepr, TMCIndan) the x64 configurations were added exactly this way — mirroring win32, toolset v145. SFILE95 already had them. No code changes were required for this (see
08-porting-changes.md, the Phase 1 section).
2.4 Selecting the platform and configuration (on every build)
In the top toolbar of Visual Studio:
- Configuration -> Release.
- Platform -> x64.
The screenshot is shared with the win32 guide — the window is the same. The image shows the
Win32platform; for the 64-bit build selectx64in this same list (configuration —Release).Throughout the ENTIRE 64-bit build: configuration Release, platform x64.
2.5 Checking the toolset (v145)
Right-click the project -> Properties -> Configuration Properties -> General -> Platform Toolset must be v145.
The screenshot is shared with the win32 guide — the properties window is the same, the toolset is the same v145. Open the properties with the
x64platform selected (the configuration/platform lists at the top).
Done. Proceed to 03-build-libs.md.